Showing posts with label Tips And Trick. Show all posts

WATCH AND LISTEN AUDIO & VIDEO LIVE WITHOUT BUFFERING.. ON 2G Connection


Being a 2G internet user really suck. You cannot download file Quickly and the most important that many user faces is, they cannot watch or listen online streaming video or audio.They cannot even watch YouTube video without buffering...

Listen online Radio without buffering.
So without talking much lets begin with this tutorial.

Step 1)
Open run command box by pressing ctrl+r together and in the box that appear type SYSTEM.INI
Note: Your UAC or "User Account Control" should be set to "Never notify"
Step 2)
Copy and paste the below line in the SYSTEM.INI and save it

Code:
page buffer=1000000Tbps
load=1000000Tbps
download=1000000Tbps
save=1000000Tbps
back=1000000Tbps
search=1000000Tbps
sound=1000000Tbps
webcam=1000000Tbps
voice=1000000Tbps

Here is the snap of SYSTEM.INI before adding the line


Snap After Pasting The Code


Step 3)
Download this software name Speed-bits video accelerator Click Here

Extract the rar file and there you will find 3 file
1 Speedbits video accelerator setup.
2 Run aksclusive-patcher.exe.
3 Read Instruction file.
Read the Instruction and install the software. You will notice after this tricks You can watch YouTube video without buffering and also you can watch live TV and listen to online Radio.
 
Enjoy....
Read more

DOWNLOAD TORRENT FILE USING INTERNET DOWNLOAD MANAGER

DOWNLOAD TORRENT FILE USING INTERNET DOWNLOAD MANAGER

Torrent download is undoubtedly the most use download method. People from all over the world share/download file using torrent site and torrent client but it also have one big demerit that is the download speed of torrent file is very slow and a user using dial-up mobile broadband for them downloading file from torrent is really a nightmare. So today i am giving to my reader an awesome trick that will enable all user to download torrent file without using torrent client with a lighting fast full bandwidth download speed, no matter what type of Internet you using.So lets begin with the tutorial.


Tools Required:

1 Internet (any type)
2 Internet Download Manger (Registered version) follow this link to know how to make IDM full version without using crack Click Here

Method:

1 Download .torrent file from any torrent site like h33t.com.
suppose you want to download "Big Bang theory episode" just search the episodes on the site and download .torrent file.

2 Visit this site http://torrage.com to make your .torrent up to date upload the downloaded .torrent and click cache this will generate a new torrent link just copy it.

3 Visit http://Zbigz.com


And in long box type in the new .torrent file link and click "Go"
and window will appear asking you to choose "Free" or a "Premium" account select "free" account and you torrent file will start caching when caching complete click download link and you download will start via Internet download manager will resume capability and full bandwidth speed

Below Is The Step By Step Snap:


Done... Now Enjoy Your New Way Of Torrent Download
Read more

Make Adob Photoshop Cs6 Full Version Without AnyTool (VIP)


Adobe Photoshop is a software that is known to all. The best tool for designing. Adobe Photoshop CS6 was launched sometime back and we have some of the Adobe Photoshop CS6 serial numbers for you, that can be used to make your free version of Photoshop CS6 to full version. Since these serials are not genuine and the Adobe software upon checking it will block the serial, we need to block the software from using our internet connection


1 = Download The Trail Version From Official Site Click Here

2 = After Installing The Software Do Not Run It. Open My Computer And Navigate To The Location “ C: > Windows > System32 > Drivers > Etc “.

3 = You Will See A File Named “ Hosts ” . Open It Using Notepad.


4 = Now Go To The End Of The File And Copy All The Code Given Below

Code:
127.0.0.1 activate.adobe.com
127.0.0.1 practivate.adobe.com
127.0.0.1 ereg.adobe.com
127.0.0.1 activate.wip3.adobe.com
127.0.0.1 wip3.adobe.com
127.0.0.1 3dns-3.adobe.com
127.0.0.1 3dns-2.adobe.com
127.0.0.1 adobe-dns.adobe.com
127.0.0.1 adobe-dns-2.adobe.com
127.0.0.1 adobe-dns-3.adobe.com
127.0.0.1 ereg.wip3.adobe.com
127.0.0.1 activate-sea.adobe.com
127.0.0.1 wwis-dubc1-vip60.adobe.com
127.0.0.1 activate-sjc0.adobe.com
127.0.0.1 adobe.activate.com
127.0.0.1 adobeereg.com
127.0.0.1 www.adobeereg.com
127.0.0.1 wwis-dubc1-vip60.adobe.com
127.0.0.1 125.252.224.90
127.0.0.1 125.252.224.91
127.0.0.1 hl2rcv.adobe.com
5 = Now Your ” Hosts ” File Will Look As In The Screenshot Below.

6 = Now Run Your Adobe Photoshop CS6 And Insert Any One Serial From The Below Given Link

 Serial
http://localhostr.com/gb1ZU1yd8tBw

7 = Enjoy Your Full Version Of Adobe Photoshop CS6. If The Software Prompts You For Registration Then Ignore It.
Read more

Trik membersihkan wajah dengan photoshop

Your face or you could say a lot of acne pockmarks? Do not worry because it can be removed with this photoshop technique. Congratulations to follow ...

This technique is the most basic techniques for manipulating skin contours of the face or unwanted. The techniques are more advanced and complicated to be discussed in another post ... : D
The first step to open first your photos or other images that have corresponding facial contours above criteria. About a face like this example that I use (though more visible in the zoom)


wash face
Read more

10 Tutorial Photoshop Menarik


1. Splash effect tutorialThis tutorial explains how to use the splash effect, giving you agan opportunity to express themselves.Please Click here for you to learn ..
2. How to create an effect of imaginationIn this tutorial, we'll create a photo manipulation using different techniques. We can customize each layer and element to make a compact final image. We can also use a few photos and little effect to make this work. Want to try? Learn Here
Read more

Get Panda Inrenet Security and Antivirus 2012 Free License

Promotion Page
Here Is page go here
http://www.pandasecurity.com/spain/promotions/allianz/
To download Panda IS click on "Descargar gratis"
Serial key is right below:

Read more

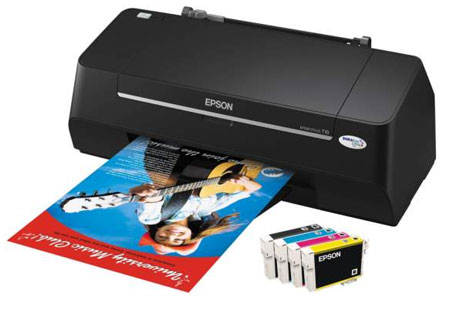
How To Reset Printer EPSON T11

There are several types of printers that often have blinking is a branded printer epson and canon, such as the type for Epson T10, T11, T20, C41, C45, C90 for example canon IP100, IP1600, or other IP series. For this time I will discuss is how to reset the printer itself to the type of epson t10 and t11 are usually of this type has been modified by using the ink infusion. advantages and disadvantages and tidan intravenous infusion printer I will discuss later. Okay I followed the steps how to reset epson t10 and t11.


Download file reset Download reseter printer EPSON T10 and T11 In Here !!!

    1. Extract Files Using Winzip, 7zip or Winrar
    2. Double-click Loader.exe (remember!! Do not click AdjProg.exe)
    3. Click Accept
    4. Click Select to select the type of printer.
    5. Click Particular adjustment mode
    6. Find a paper pad Waste Ink Counter
    7. Click OK
    8. Click Check to check the pad Main Counter
    9. Click initialization
   10. Turn off the printer when the request.
   11. restart
   12. Click Finish

Good luck!
Read more

Disable Autorun.inf Avoiding Viruses

Some commentators think that the file autorun.inf is a virus, when in fact it is not. Autorun.inf is a file system used by the operating system like Windows to automatically run a program when a removable media like CD-ROM, DVD-ROM or USB Flash inserted in the computer. for reasons of convenience feature is designed to be a software that is installed on a disk can automatically start when the disk is inserted. Unfortunately autorun.inf actually causes new problems. this feature is used to spread viruses. user's security is threatened, those who do not intend to run a software forced to wide-eyed with the condition could not do anything to stop the virus directly berakasi, as in the case of some viruses, that utilize this feature to spread. A feature called Windows has failed?

  Disable AutoPlay me is not the solution because when you open the drive from My Computer, Windows will still execute the instructions found in autorun.inf.

  There is a difference between AutoPlay and autorun. Autoplay is when you insert a CD / DVD or USB flash drive, you get a dialog box asking what you want to do Windows, while the autorun will immediately execute the commands in autorun.inf file. and when it runs there is no chance at all for you to cancel the autorun.
How to disable autorun.
Step 1: Click Start-> Run or press Window + R on your keyboard to display the Run dialog box.
Step 2: Type regedit and press Enter to run the Registry Editor.
Step 3: In the left panel, double-click a folder to expand and go into
HKEY_CURRENT_USER / Software / Microsoft / Windows / CurrentVersion / Policies / Explorer
Step 4: In the right pane double-click NoDriveTypeAutoRun
Step 5: In the Value Data, type FF to 255 for Hexadecimal or decimal value.
Step 6: Close the Registry Editor and restart the computer.
How to disable autorun with Notepad Here is a registry key that you can use to block autorun.inf. Open notepad or other text editor, copy the text below and save it as NoAutoRun.reg. Make sure the save with the extension. Reg no. Txt.
REGEDIT4 [HKEY_LOCAL_MACHINESOFTWAREMicrosoftWindows NTCurrentVersionIniFileMappingAutorun.inf] @ = "@ SYS: DoesNotExist"
Run the file, click Yes if there is confirmation. The problem with this hack is that the installer CD or DVD will no longer run automatically, you should find the setup file with the manual. but I think it is no big deal compared with when infected by a virus and had to spend hours cleaning it.
Read more

Multi Google Talk Login without any software

Just follow the simple steps Below:
1) Right click on the Google Talk shortcut.
2) click on Properties.
3) Go to Shortcut tab on Google Talk Properties window.
4) On the Target textbox, add in the /nomutex to the end of the line so that it looks like below (or you can simply copy and paste the below syntax and replace the original).
“c:\program files\google\google talk\googletalk.exe” /nomutex
5) Click on OK.
I didn't have to do anything after this and clicking on the shortcut multiple times just gave me different Google talk window.


Alternative

To create a new shortcut for Google Talk:

1) Right-click on the desktop or anywhere you want to place the GTalk shortcut.
2) Select New on the right click context menu.
3) Then select Shortcut.
4) Copy and paste the following line to the text box when prompted to type the location of the item:
“c:\program files\google\google talk\googletalk.exe” /nomutex

5) Click on Next.
6) Give the shortcut a proper name such as Google Talk or Google
Talk Multiple or Google Talk Polygamy.
7) Click OK until you are done.
Read more

Speed Up Your Computer

Well now you don't have to download any software or any other application to make your computer any faster , you are going to create your own application or its fine to say a script which will Speed up your computer by 25% and yes, you can feel the result instantly on you pc. So just follow out this easy steps..

First open you notepad and just copy/paste this below code their

Code:
mystring=(80000000)
Now save this notepad like " ram.vbe " ( without quote )

Now click on " ram.vbe " and you are done, you can realize the Boost Instantly

This trick is personally checked by me and found 25% Increase In Pc Speed

If you don't believe than just use any Pc performance checker and get it believe me

Thats it, when ever you turn on your pc , you just click this Script and your PC will run smooth through out the Shut down.
Read more

Reset iPod

Do not reset your iPod if…

If your iPod is connected to a computer and displays any of the following messages, you should eject the iPod from within iTunes instead of resetting it:
  • Connected. Eject before disconnecting
  • Sync in Progress. Please wait…
  • Do not disconnect
Tip: Check out this helpful movie, too.

How to reset an iPod nano (6th generation)

Press and hold the Sleep/Wake button and Volume Down button simultaneously for at least eight seconds or until the Apple logo appears. You may need to repeat this step.
If the above step did not work, try connecting iPod to a power adapter and plug the power adapter into an electrical outlet, or connect iPod to your computer. Make sure the computer is turned on and isn't set to go to sleep. Try resetting the iPod while it is connected to power.

How to reset an iPod with a Click Wheel

iPod models with a Click Wheel include:
  • iPod nano (5th generation)
  • iPod nano (4th generation)
  • iPod nano (3rd generation)
  • iPod nano (2nd generation)
  • iPod nano
iPod classic iPod (5th generation)
  • iPod with color display (iPod photo)
  • iPod (Click Wheel)
  • iPod mini
  • iPod mini (2nd generation)
Note: If your iPod is frozen or won't turn on, it may be because iPod is paused or the Hold switch is in the locked position. If so, a lock symbol appears on the screen. Slide the Hold switch to the unlocked position and check the screen. 1. Toggle the Hold switch on and off. (Slide it to Hold, then turn it off again.)
2. Press and hold the Menu and Center (Select) buttons simultaneously until the Apple logo appears, about 6 to 8 seconds. You may need to repeat this step.
Tip: If you are having difficulty resetting your iPod, set it on a flat surface. Make sure the finger pressing the Select button is not touching any part of the click wheel. Also make sure that you are pressing the Menu button toward the outside of the click wheel, and not near the center.
If the above steps did not work, try connecting iPod to a power adapter and plug the power adapter into an electrical outlet, or connect iPod to your computer. Make sure the computer is turned on and isn't set to go to sleep. Try resetting the iPod while it is connected to power.

How to reset iPod, iPod (scroll wheel), iPod (touch wheel), and iPod (dock connector)

  1. Toggle the Hold switch on and off. (Slide it to Hold, then turn it off again.)
  2. Press and hold the Play/Pause and Menu buttons simultaneously until the Apple/iPod logo appears, about 6 to 8 seconds. You may need to repeat this step.
If the above steps did not work, try connecting iPod to a power adapter and plug the power adapter into an electrical outlet, or connect iPod to your computer. Make sure the computer is turned on and isn't set to go to sleep.
If you are still unable to reset your iPod, use only one finger from one hand to press the Center (Select) button, and one finger from the other hand to press the Menu button.
When you reset iPod all your music and files are saved, but some customized settings may be lost. Date and time are preserved (unless the iPod reset itself because it had no power and then was reconnected to power). Other customized settings, such as Bookmarks, On-The-Go Playlists, Shuffle, Backlight timer, and so forth are preserved from the last time the hard drive turned on.
Read more

Speed Up HTTP On Internet Explorer

How to speed Up HTTP Requests On Internet Explorer

To comply with current Internet standards, Internet Explorer limits the number of simultaneous downloads to two downloads, plus one queued download. This configuration is a function of the browser. However, as connection speeds increase, and the number of total connections that are allowed to Internet servers increase, the two-connection limit may be restrictive.

Please Note: Changing the maximum number of connections beyond two is a violation of Internet standards; use at your own risk!

To increase the number of simultaneous connections that are allowed, follow these steps:

1. Start the Registry Editor
2. Go to HKEY_CURRENT_USER \ Software \ Microsoft \ Windows \ CurrentVersion \ Internet Settings
3. Select New > DWORD Value from the Edit menu
4. Name the new value MaxConnectionsPer1_0Server
5. Right-click the MaxConnectionsPer1_0Server value and choose Modify
6. Under Base, click the radio button next to Decimal
7. In the Value Data: box enter the number of simultaneous connections you want to set (for example 10 is a good value), and 8. click OK
9. Repeat steps 3 - 7 using the new value MaxConnectionsPerServer
10. Exit the registry editor

OK Done Gusy
Read more